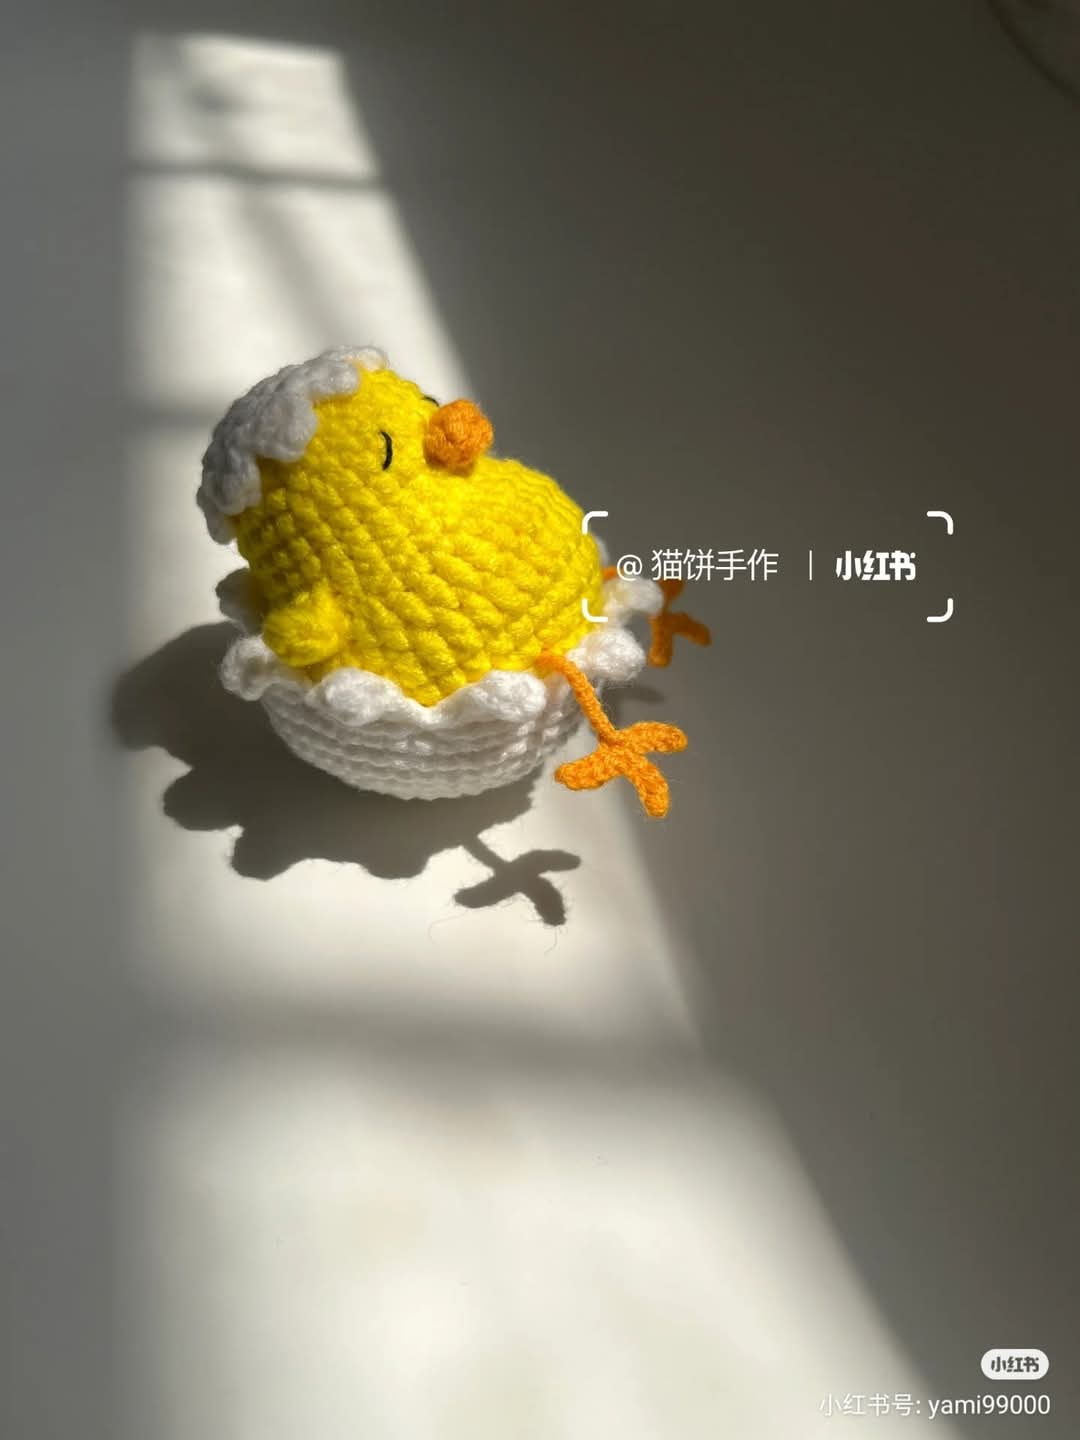
🐣 Soaked Chick in an Eggshell – A Bath-Time Amigurumi Delight!
🧶 Materials Needed:
Yellow yarn (main body)
White yarn (egg shell)
Orange yarn (beak and legs)
Black yarn (eyes or safety eyes)
2.0 mm crochet hook
Fiberfill stuffing
Tapestry needle
Scissors
Stitch marker (optional)
🪡 Abbreviations (US Crochet Terms)
Here’s a quick reference of the abbreviations used:
MR – Magic Ring
sc – Single Crochet
Hdc - Half Double Crochet
Dc - Double Crochet
Tr - Treble Crochet
inc – Increase (2 sc in the same stitch)
dec – Decrease (single crochet two stitches together)
BLO - Back Loop Only
FLO - Front Loop Only
ch – Chain
sl st – Slip Stitch
st – Stitch
x – Times (e.g., repeat count)
R - row
L - Loop
FO - Finish Off
🐥 Pattern Instructions
Chick Body (Yellow):
R1: 6 sc in magic ring [6]
R2: 6 inc [12]
R3: (sc, inc) × 6 [18]
R4: (sc, inc, sc) × 6 [24]
R5: (3 sc, inc) × 6 [30]
R6: 8 sc, (sc, inc) x7, 8 sc [37]
R7–8: sc around [37]
R9: 16 sc, 5 hdc, 16 sc [37]
R10: 9 sc, 19 hdc, 9 sc [37]
R11: 8 sc, 21 hdc, 8 sc [37]
R12: 8 sc, (5sc, dec) x3, 8 sc [34]
R13: (4 sc, dec) ×2, (3 sc, dec) ×2, (4 sc, dec) ×2 [28]
R14: 28 sc [28]
R15: 11 sc, inc, 4sc, inc, 11 sc [30]
R16-R17: 30 sc [30]
R18: (4 sc, dec) × 5 [25]
R19: 25 sc [25]
R20: (3 sc, dec) × 5 [20]
R21: (2 sc, dec) × 5 [15]
R22: (sc, dec) × 5 [10]
Fasten off. Stuff firmly and close the opening.
Eggshell (White):
Top:
R1: 6 sc in magic ring [6]
R2: 6 inc [12]
R3: (sc, inc) × 6 [18]
For side, ch 3, from 2nd ch, sc, hdc, skip, sl st.
Do it 6 times for shell effect.
Bottom:
R1: 8 sc in magic ring [8]
R2: 8 inc [16]
R3: (sc, inc) × 8 [24]
R4: (sc, inc, sc) x 8 [32]
R5: 32 sc [32]
R6: (3 sc, inc) × 8 [40]
R7: (2 sc, inc, 2 sc) x 8 [48]
R8: 48 sc [48]
For side, ch 5, from the 2nd ch, sc, hdc, 2 dc, skip 3 loop, sl st in 4th loop,
repeat for 12 times to make the shell effect.
Fasten off, leaving the tail for sewing.
Wings (Yellow, make 2):
Ch 6, in the 2nd ch from the hook, 4 hdc, sc
Fasten off and flatten to sew.
Beak (Orange):
R1: ch 12, sc, hdc, 2 dc, hdc, sl st, hdc, 2 dc, hdc, sc.
Fasten off, sew to face.
Legs (Orange, make 2):
Toes: (ch 5, in the 2nd ch from hook, 4 sl st) x3
Leg: ch 9
Attach toes to end of leg chain. Weave in and shape as desired.
🧩 Assembly Instructions
Stuff the chick's body and sew closed.
Attach the white shell piece to the bottom of the body.
Sew the wings to both sides of the chick body.
Sew or embroider the beak between rounds 6–8.
Use black yarn or safety eyes to place eyes evenly on either side.
Sew the legs at an angle to look like they're splashing out from the shell.
Weave in any remaining ends and fluff the fiberfill to shape.
Optional: Use pink blush or yarn for cheek details!
💖 Support Us
If you enjoyed this free pattern, support us by:
Following us on Instagram, Pinterest, Threads, YouTube
Purchasing handmade items from our Depop
Buying us a coffee on Ko-fi (@cozycrochettales)
Your support helps us create and share more cozy designs with the community. Thank you! 🧶💛

🐤 A Bathing Chick You’ll Love to Make Again and Again!
Congratulations! You’ve now completed the cheeky Soaked Chick in an Eggshell plush! With its adorable pose and comic charm, this tiny amigurumi is a lighthearted gift or a whimsical shelf companion. Its rounded body, flappy wings, and lounging legs give it a unique personality that stands out from typical chick patterns. This project is quick to make, but its quirky details leave a lasting impression. Customize your chick with different shell colors, or add accessories like a towel or rubber duck for extra fun! Great for gifting, displaying, or selling at craft fairs, this little chick is always ready for a soak and a smile.
📸 Credits
Original pattern by 小红书 artist 猫饼手作
English translation and blog adaptation by Cozy Crochet Tales
📌 Pattern Credit & Disclaimer
This crochet pattern is inspired by a design created by 猫饼手作, a talented crochet artist who originally shared their work on platforms like 小红书 (Xiaohongshu). These beautifully crafted pieces have been shared across various social media platforms, and we discovered them as part of our love for handmade creations.
We do not claim ownership of the original design. This version has been translated and adapted into US crochet terms purely for educational and personal crafting purposes, to help fellow crocheters follow along more easily.
Our goal is to share joy, promote creativity, and encourage handmade artistry while respecting the original creator’s work. If you are the original artist and would like credit updated or content removed, please contact us directly—we’re happy to cooperate and make any necessary changes.
🧶 Support independent artists by exploring and supporting their original creations whenever possible.
Comments
Post a Comment